Adding Employees
Overview
Section titled “Overview”The employee directory is the central hub for managing all staff information in your organisation. This comprehensive guide covers the complete process of adding new employees with all required information across three main tabs: Basic Info, Employment Info, and Personal Info. The system ensures all employee details are captured correctly for payroll, scheduling, and HR management purposes.
Before You Begin
Section titled “Before You Begin”Make sure you have:
- Locations created and configured
- Working patterns set up
- Time-off policies configured
- Employee details ready (name, email, job title, start date)
What is the Employee Directory?
Section titled “What is the Employee Directory?”The Employee Directory is a complete database of all staff members including:
- Personal information (name, email, contact details)
- Employment details (position, location, working patterns)
- Financial information (pay rates, bank details)
- Employment history (joining date, hours contracted)
Accessing Employee Directory
Section titled “Accessing Employee Directory”- Click HR Essentials in the left sidebar
- Select Employee Directory
- Click the Add button (with plus icon)
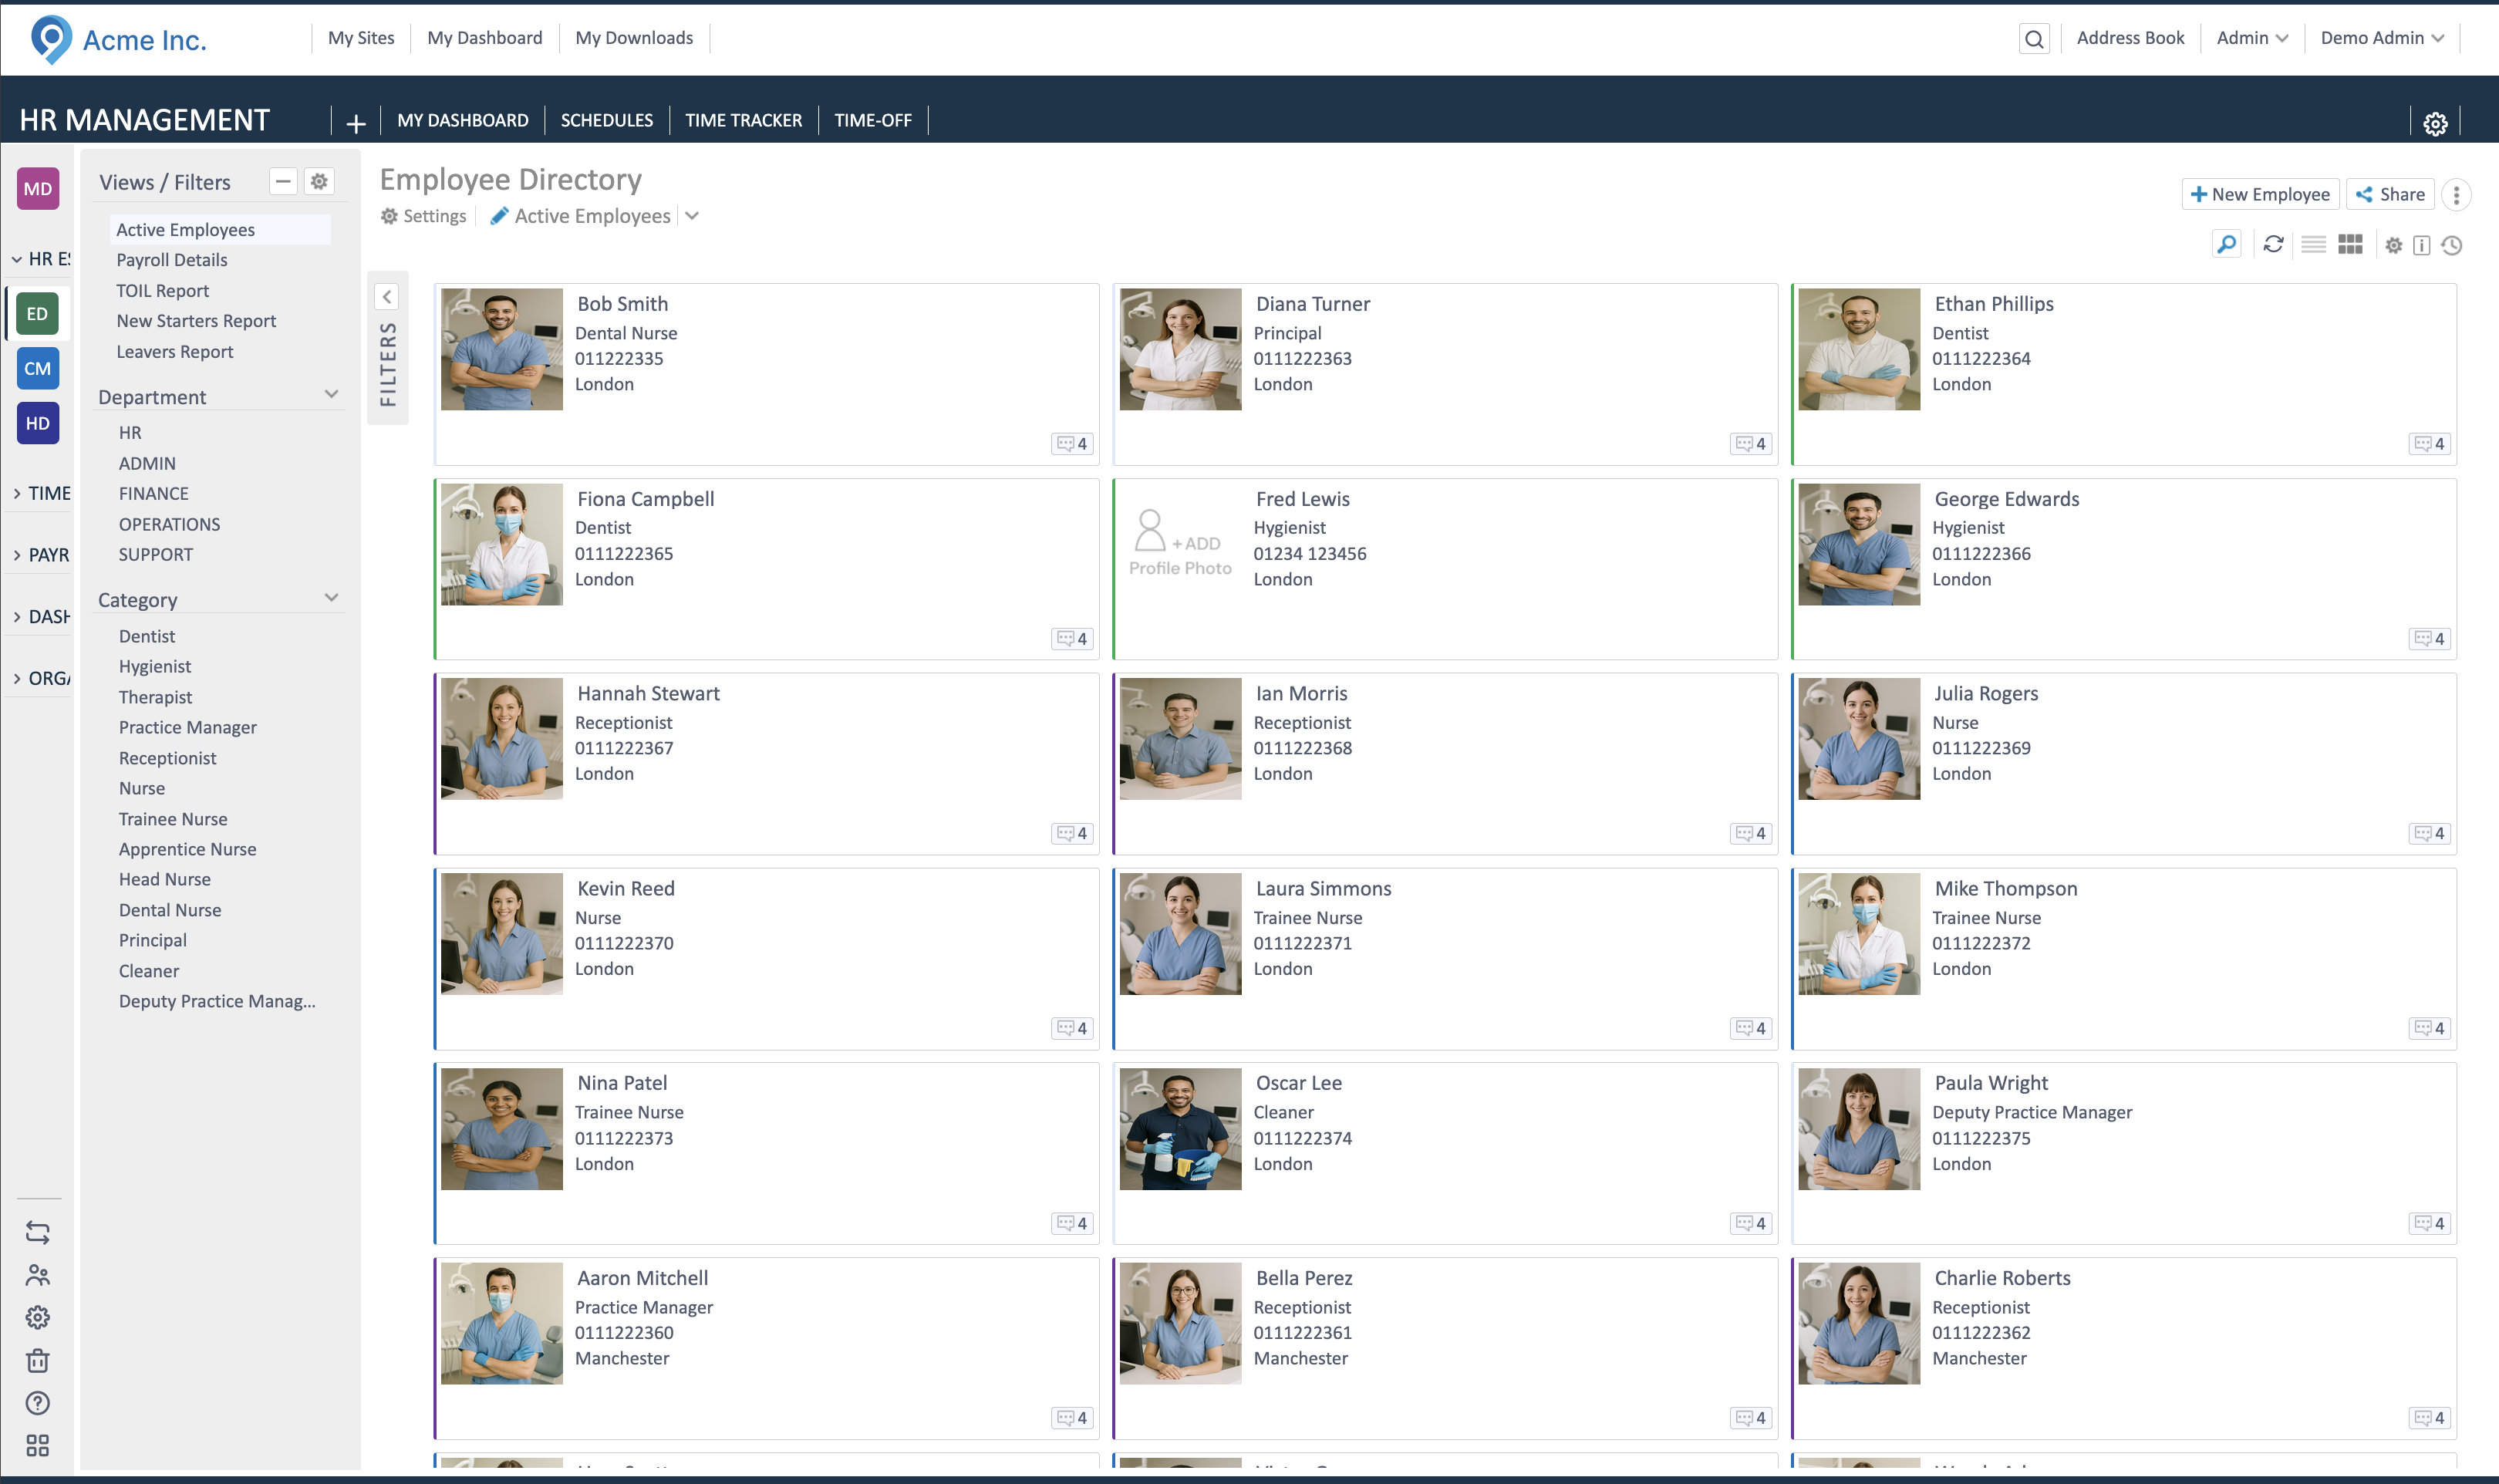

The employee form opens with three tabs: Profile, Work, and Personal.
Tab 1: Profile
Section titled “Tab 1: Profile”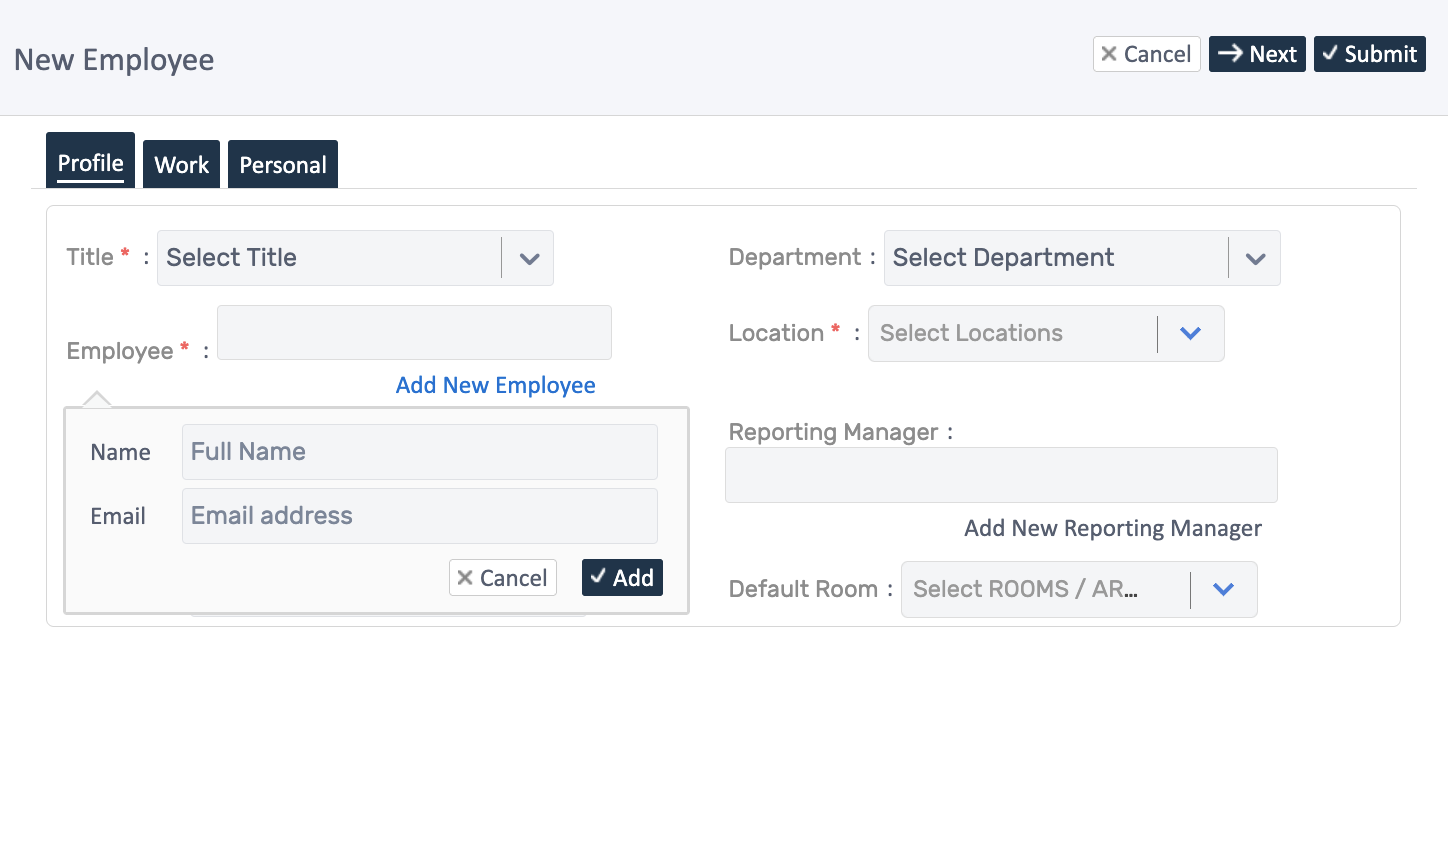
This tab captures basic identifying information.
Add Contact Information
Section titled “Add Contact Information”This is the first and most critical step:
- Click “Add New Employee” link in the Employee field
- A popup appears with two fields:
- Name: Enter full name (e.g., “Alice Johnson”)
- Email: Enter unique email address (e.g., alice.johnson@company.com)
- Click Add to save
The name and email are now locked in for this employee record.
Complete Profile Details
Section titled “Complete Profile Details”Title (Required)
Select from: Mr., Mrs., Ms., Miss, Dr., Professor
Phone
Enter employee’s contact phone number
Department
Select the department (optional)
Category (Required)
Choose job role/category (e.g., Dentist, Nurse, Receptionist, Practice Manager)
Location (Required)
Select primary work location from dropdown - this determines where the employee is assigned
Reporting Manager
Select who this employee reports to, or click “Add New Reporting Manager” if not in system yet
Default Room
Select the employee’s default work area/room
Click Next to move to Tab 2.
Tab 2: Work
Section titled “Tab 2: Work”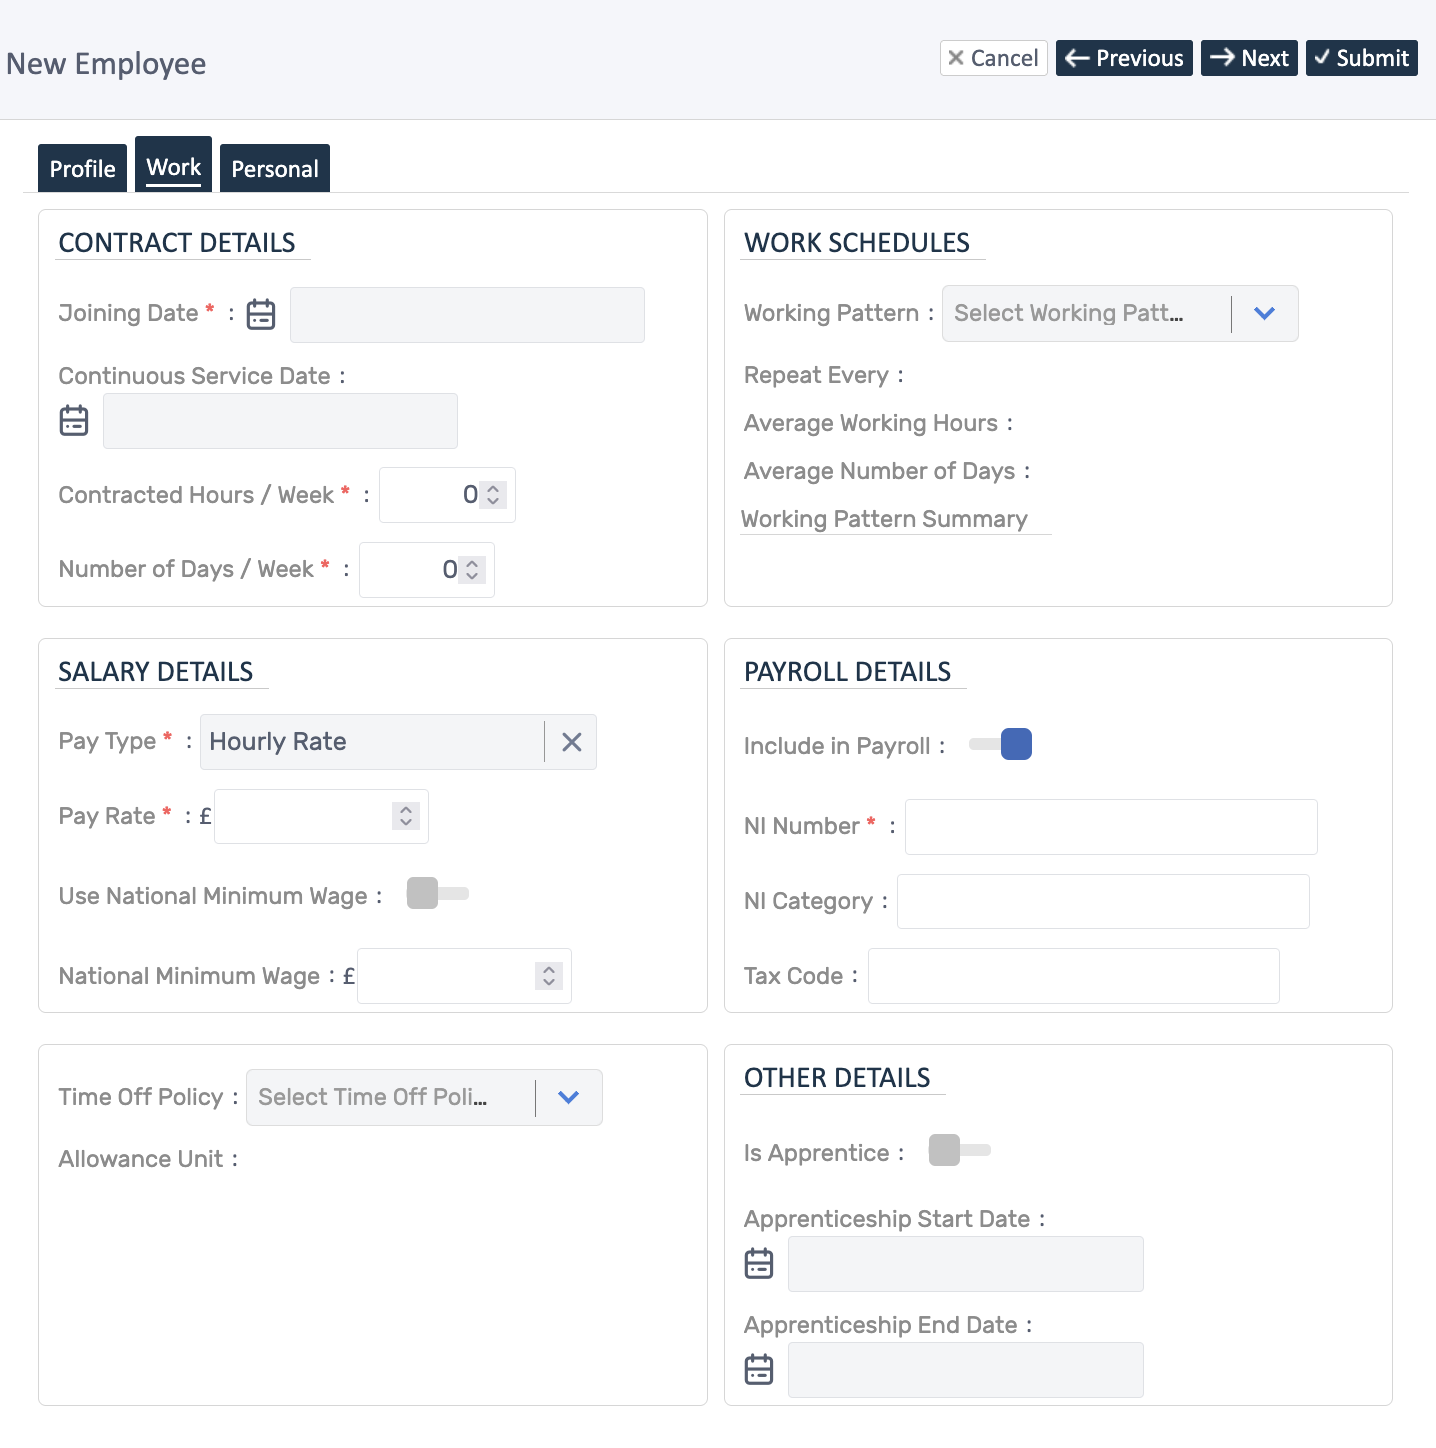
This tab captures employment and payroll information.
Contract Details
Section titled “Contract Details”Joining Date (Required)
Select the employee’s start date
Continuous Service Date
Used for calculating benefits/accruals (usually same as joining date)
Contracted Hours / Week (Required)
Enter weekly contracted hours (e.g., 37.5)
Number of Days / Week (Required)
Enter working days per week (e.g., 5)
Work Schedules
Section titled “Work Schedules”Working Pattern (Required)
Select from configured patterns (e.g., “9 to 5 as 37.5 hours”, “20 Hours Part Time”) - this determines expected working hours for timesheets
The system automatically shows:
- Repeat Every (pattern cycle)
- Average Working Hours
- Average Number of Days
- Working Pattern Summary
Salary Details
Section titled “Salary Details”Pay Type (Required)
Choose: Annual Salary or Hourly Rate
Pay Rate (Required)
Enter amount in £
Payroll Details
Section titled “Payroll Details”Include in Payroll
Toggle on to include employee in payroll processing
NI Number (Required if in payroll)
Enter National Insurance number
NI Category
Select NI category (usually A)
Tax Code
Enter tax code (provided by HMRC or employee)
Time Off Policy
Section titled “Time Off Policy”Time Off Policy (Required)
Select leave policy (e.g., “Standard 28 Days”, “Zero Hours Time Off Policy”)
Allowance Unit
Shows unit (days or hours) based on selected policy
Other Details
Section titled “Other Details”Is Apprentice
Toggle on if employee is an apprentice
Apprenticeship Start Date / End Date
Required if apprentice
Click Next to move to Tab 3 (or Previous to return to Tab 1).
Tab 3: Personal
Section titled “Tab 3: Personal”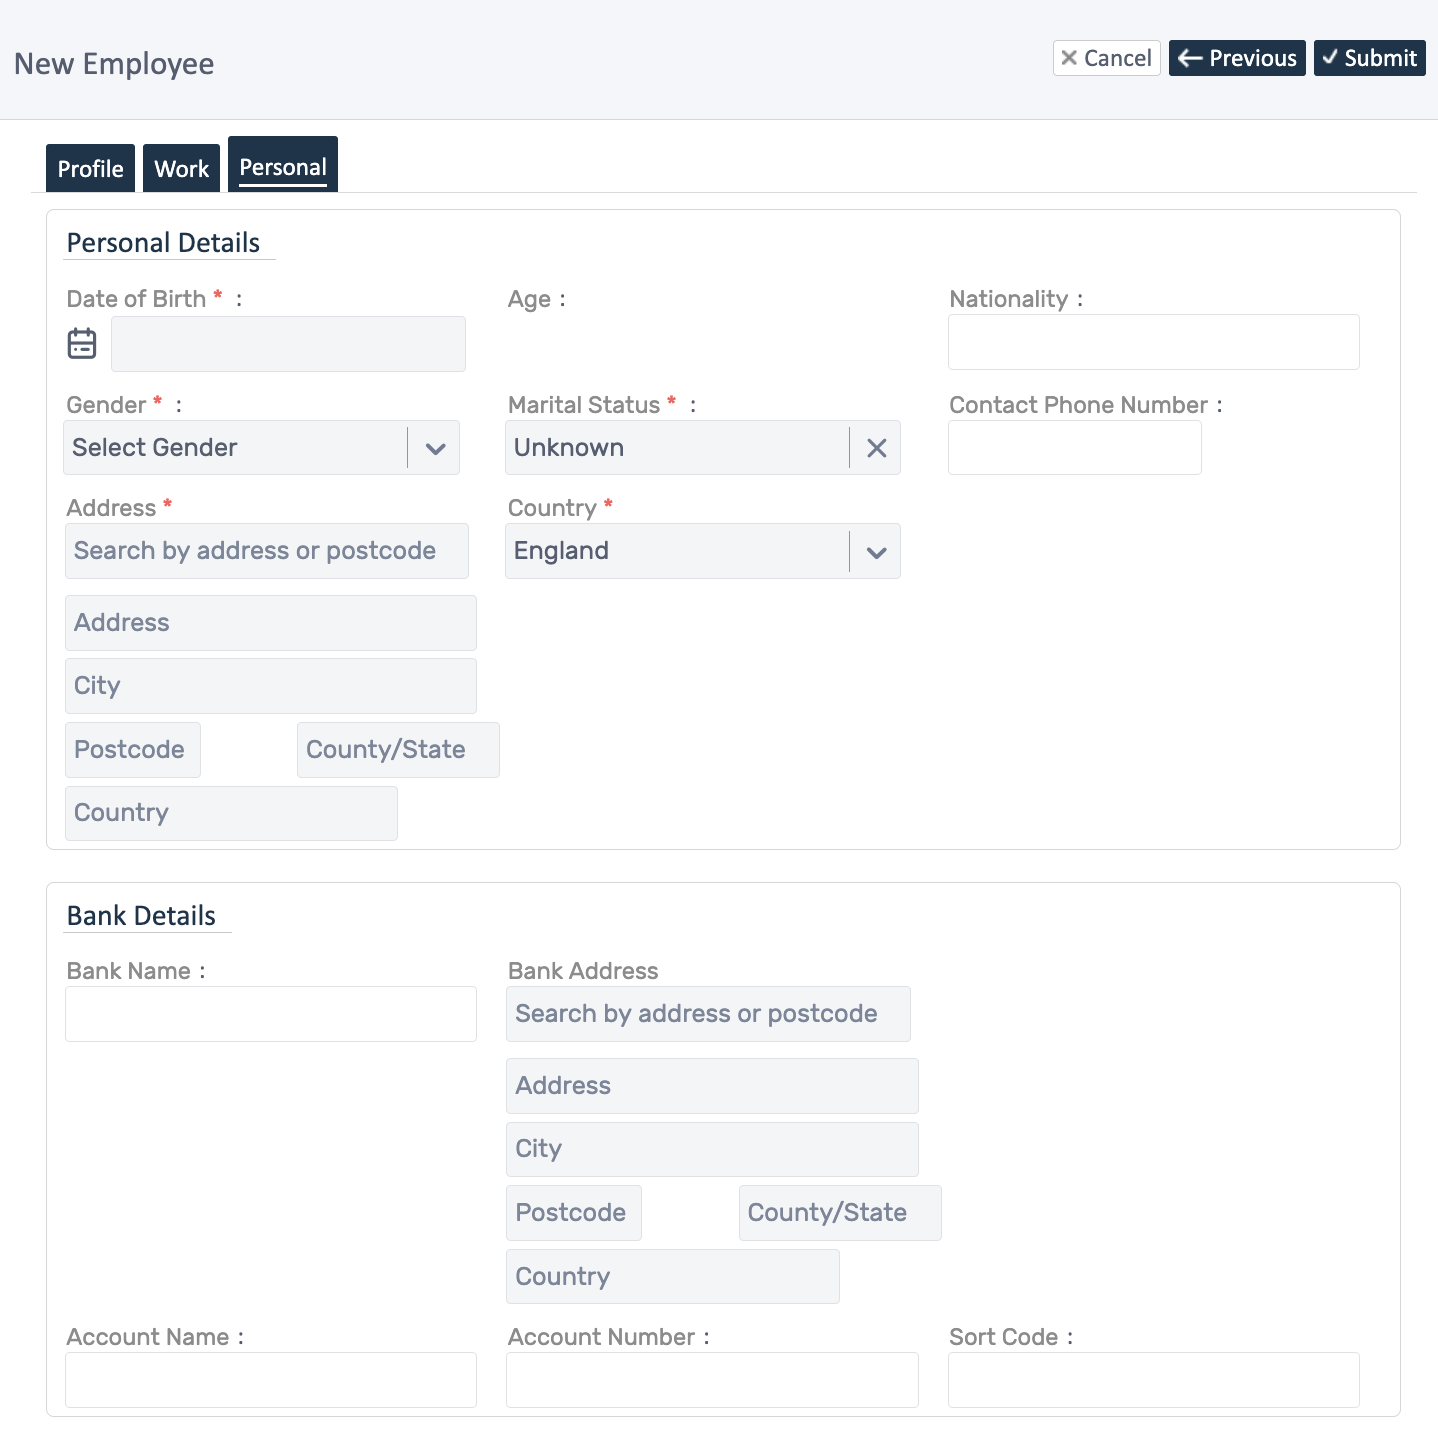
This tab captures personal and banking information.
Personal Details
Section titled “Personal Details”Date of Birth (Required)
Select from calendar
Age
Automatically calculated
Nationality
Enter nationality (optional)
Gender (Required)
Select: Male, Female, Other, Prefer not to say
Marital Status (Required)
Select: Single, Married, Divorced, Widowed, Unknown
Contact Phone Number
Additional contact number (optional)
Address (Required)
Search by postcode or address - system autocompletes with street, city, postcode, county, and country
Country (Required)
Defaults to England
Bank Details
Section titled “Bank Details”Bank Name
Enter employee’s bank name
Bank Address
Search by postcode for bank branch location
Account Name (Required)
Enter name on bank account
Account Number (Required)
Enter bank account number
Sort Code (Required)
Enter 6-digit sort code
Saving the Employee
Section titled “Saving the Employee”After completing all three tabs:
- Click Submit button (top right)
- System validates all required fields
- Employee is created and added to directory
- You’re returned to Employee Directory with confirmation
The new employee now appears in the directory and is ready for scheduling, timesheets, time-off requests, and payroll.
Quick Tips
Section titled “Quick Tips”Required Fields
Fields marked with red asterisk (*) must be completed
Navigation
Use Next and Previous buttons to move between tabs
Use Cancel to abandon without saving
Use Submit when ready to save (validates all tabs)
Common Errors
- Email already exists: Each employee needs unique email
- Missing location: Location is required
- Missing working pattern: Required for scheduling
- Missing pay details: Required if included in payroll
Best Practices
- Complete the “Add New Employee” contact popup first
- Fill in all three tabs before submitting
- Double-check email addresses (used for system login)
- Verify working pattern matches contract
- Ensure time-off policy is assigned
What Happens Next?
Section titled “What Happens Next?”Automatic Actions:
- Employee record created
- User account automatically created (if enabled)
- Employee receives welcome email with login instructions
- Time-off allowance calculated based on policy
- Employee appears in scheduling and payroll
Next Steps:
Need Help?
Section titled “Need Help?”Can’t find a location?
Create locations first in Organisation > Locations
Working pattern not available?
Set up working patterns in Timesheet Management > Working Patterns
Time-off policy missing?
Configure policies in Time-Off Management > Time-Off Policies
Employee won’t save?
- Check all required fields (marked with *)
- Ensure email is unique
- Verify location, working pattern, and time-off policy are assigned
For more help, see: